Visual Guide
What is the OBYX Wallchart
The OBYX Wallchart is a useful quick reference to find keywords and structure of constructs. XML has a hierarchical structure which lends its self perfectly to a diagram based representation. The OBYX Wallchart has been specially created to aid OBYX development. You can view the map here:
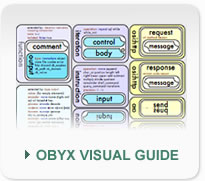
How to Use the OBYX Wallchart
The chart is divided into columns. The middle column displays the four core functions available in OBYX. For each function you can see the attributes available to the function and the input and ouput requirements. The left column describes various common input and ouput attributes and values, whilst the right hand column conceptualises the OSI processing abilities of OBYX. The green boxes at the bottom of the chart provide quick look up references to a number of special values.
Using the chart by example: Iteration
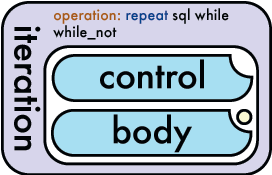
You can see by looking at the Iteration block, that an iteration may take an operation attribute of either repeat, sql, while or while_not. "repeat" is highlighted in blue, this indicates that this is the default value if none is specified. This gives us the structure of out iteration instruction:
<iteration operation="repeat">
	...your code here...
</iteration>
You can see from the diagram that iteration takes as input a 'control' and a 'body' element. The notch out of the top right of the 'control' lozenge means that there can be a mximum of 1 of these elements (see key in bottom left of chart). The body lozenge also has a notch, so there must be no more than one of these also. (The body lozenge also has a yellow dt in the corner - this indicates that the body is exectued only after the control has been evaluated).
<iteration operation="repeat">
	<control>...your control here...</control>
	<body>...your body here...</body>
</iteration>
Both the control lozenge and the body lozenge are coloured blue, this indicates they are of type 'itype'. The itype block on the chart can be found in the lower left. You can see here that an itype may take multiple attributes (such as type and eval). The chart displays the values available for each of these attributes. The itype is itself an extension of the iko (input-key-object) block, which has further attributes available. Imporantly we can see that any element of type iko (anything thats blue!) can contain sub elements of type xml, text or functions.
Here we have decided to use a store called 'myVar' to manage the control. Our body will contain an instruction.
<iteration operation="repeat">
	<control space="store" value="myVar" />
	<body>
		...what now?...
	</body>
</iteration>
In this case we shall use the instruction to display the square of myVar. Looking back to the diagram, we can see the 'instruction' block takes up to two atributes. We are interested in the 'operation' attribute, specifically the value 'multiply'.
<iteration operation="repeat">
	<control space="store" value="myVar" />
	<body>
		<instruction operation="multiply">...</instruction>
	</body>
</iteration>
You can see the instruction can take only an element of type 'input'. The notch out of the bottom left of the input lozenge indicates that here must be at least 1 input. In our case we need two inputs as we want to multiply one by the other. The input element is blue, so is of type 'itype' and works just like all the other input elements.
<iteration operation="repeat">
	<control space="store" value="myVar" />
	<body>
		<instruction operation="multiply">
			<input space="store" value="myVar">
			<input space="store" value="myVar">
		</instruction>
	</body>
</iteration>
You can see from the diagram that the functions iteration, instruction comparison and mappign are all coloured purple. This means they are an extension 'function' which is described in the top left block on the chart. You can see from this that all funcitons may contain comment or output elements. We havent actually specified any output eelements, so the output defaults to the space 'immediate' as indicated by the chart.
If we wanted to put the result of the squares into store variables we need to add specific outputs to the code. We shall add two here, one for the repeat iteration and one for the squaring instruction. Note we still want an 'immediate' output in the inner instruction. We shall also add a comment whilst we're at it.
<iteration operation="repeat">
	<output space="store" value="theSquares" />
	<control space="store" value="myVar" />
	<body>
		[<instruction operation="multiply">
			<comment>Squares the variable myVar by multiplying it against itself.</comment>
			<output space="store" value="theSquare" />
			<output space="immediate" />
			<input space="field" value="#Row">
			<input space="field" value="#Row">
		</instruction>]
	</body>
</iteration>
After execution with an initial setting of myVar=5 theSquares=[1][4][9][16][25] theSquare=25
Last Modified: Thu, 15 Jan 2015